

|

|

|
An ALE file is an ASCII text file that is interpreted when your application is run. If you want to compile your ALE file into your application, an additional compilation step will be needed, but you don't have to do anything special to the original ALE file.
An ALE file can define multiple dialogs. Each section of an ALE file defines a single container, and you can have multiple sections.
An ALE file should have two basic elements:
Let's have a look at an ALE file, simple.ale, that defines a dialog with a single button.
section main
{
   button1(p, p, w / 2, h / 2, CC)
}
The section groups the components defined within it. Any components defined between the opening and closing braces are included in the section.
The component breaks down like this:
name(width, height, X point, Y point, alignment)
where:
In our example, the name is button1.
In our example, the width is p, the preferred width of the component. p in the example is a placeholder meaning "use the preferred size".
In our example, the height is p, the preferred height of the component.
In our example, the X point is w / 2, meaning half the width of the dialog. The variable w refers to the dialog's entire width.
In our example, the Y point is y / 2, meaning half the height of the dialog. The variable y refers to the dialog's entire height.
In our example, the alignment is CC (Center Center).
Also, it's important to note here that the point defined by X,Y is a point around which the component will be aligned. In this example, the point is at exactly half the width and half the height of the dialog -- the exact center. The alignment attribute (here defined as CC, or Center Center) determines where the component will lie relative to the X,Y point.
This file generates this dialog:

This is simplest dialog you can create.
ALE provides two methods you can use to position components quickly and easily:
section main
{
   // 3 x 3 grid, xMin/yMin is (0, 0) xMax/yMax is (w, h)
   // it will cover the entire parent container

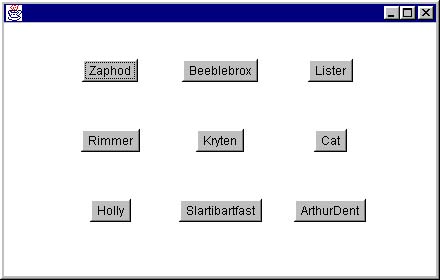
   grid(3, 3, 0, 0, w, h)
   {
      // Note that the purpose of "grid" is to determine
      // x and y locations for the components.
      // For this reason we put "0, 0" in for
      // the location fields for each of the components.

      button1(p, p, 0, 0, CC)
      button2(p, p, 0, 0, CC)
      button3(p, p, 0, 0, CC)
      button4(p, p, 0, 0, CC)
      button5(p, p, 0, 0, CC)
      button6(p, p, 0, 0, CC)
      button7(p, p, 0, 0, CC)
      button8(p, p, 0, 0, CC)
      button9(p, p, 0, 0, CC)
   }
}
The grid syntax is:
grid(rows, columns, xmin, ymin, xmax, ymax)So our grid breakdown is:
In our example, w is the greatest point in X, or the width of the dialog where this grid will be drawn.
In our example, w is the greatest point in Y, or the height of the dialog where this grid will be drawn.
The component syntax is the same as the previous component syntax, except that the X,Y point, used for positioning the component at a particular point, is ignored. The alignment attribute is still used.
This ALE file generates this dialog:

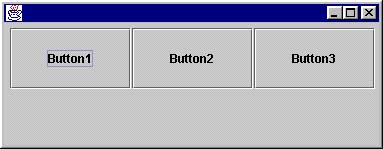
An ALE file that contains a flow looks similar to:
   flow(HORIZONTAL, 5, w - 5, 5)
   {
      button1 ((w - 10) / 3, h / 2,     0, 0, CT)
      button2 (button1.w,    button1.h, 0, 0, CT)
      button3 (button1.w,    button1.h, 0, 0, CT)
   }
The flow syntax is:
flow(direction, start point, end point, opposing direction centerline)So our flow breakdown is:
This file generates this dialog:
